
BHIMA
Basic Hospital Information Management Application
Bhima is a free, open source accounting and hospital information management system (HIMS) tailored for rural hospitals in Africa. We are an international team based in the Democratic Republic of the Congo.
» Home / Stock Management / Stock Movements / Stock Entry
Stock Entry
There are four ways that stock enters a depot that will be described in detail below:
Before a depot or pharmacy gets stock to “enter”, it is necessary to determine how much stock is needed. Depots typically need that information to put together a purchase order. Pharmacies typically need this information to request stock from a depot. In any case, computations of how much stock is being used (per month) is helpful. This is provided by the “Average Monthly Consumption”. For more detaisl about that, please see the section on Average Monthly stock Consumption.
Stock Entry by Purchase
The process of purchasing stock for a depot includes several steps.
Create a purchase order
To create a purchase order, open the “Purchase Order” form:
menu > Purchase Orders > Purchase
⇒ Opens a new purchase order form
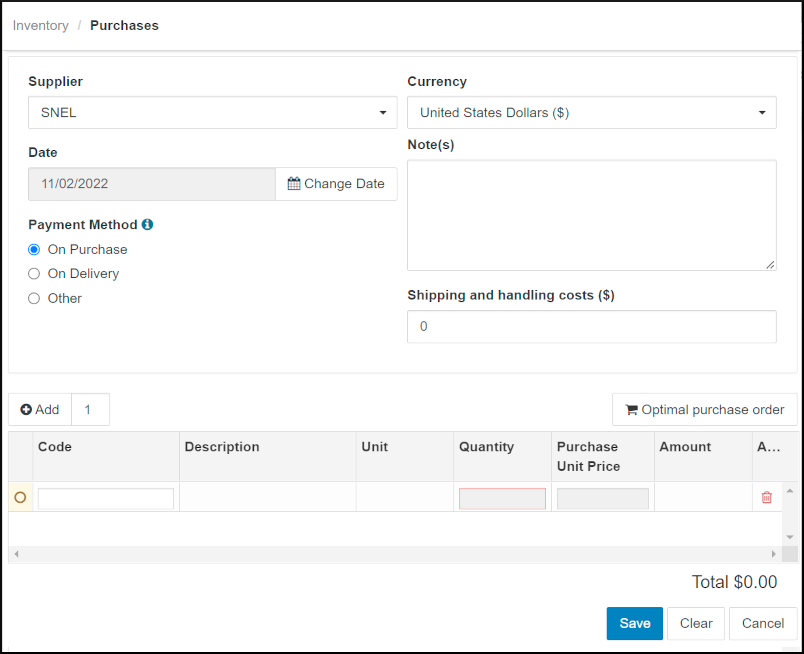
This will bring up a form like this:
-
Fill the form from top to bottom.
-
On the “Supplier” field, the caret on the right suggests that there is a list of pre-configured suppliers. Click on the field to bring up the list, then select the supplier concerned by clicking on it.
-
To the right of the Supplier field, on the right, there is a “Date” field with a suggested date; if you wish to change it, click on the button on the right corner “Change the date”.
-
Below the name of the supplier, the system offers you three options for the payment method; click on the small circle to the left of the desired payment method,
-
Click on the “Note(s)” field to activate the cursor to insert the description or notes related to the order.
-
The following table is for the items requested in the Purchase order. Enter the items of the order by clicking on the “Code” field. This lets you type into the field. As soon as you enter a few characters of the item, the system offers you a list of products that contain those letters. Click on the desired item to select it. The other fields on the same line, from left to right, become active as you go along, fill each field by clicking on it including quantity desired and requested unit purchase price.
Initially, the form will show a single line for one item. To add rows for more items, click on the “Add” button just above the top left corner of the table and fill them out as needed. Items can be removed by clicking the Trashcan icon on the right end of the row.
-
To confirm and save the order, click on the “Save” button at the bottom of the form on the right.
-
To abort creating the purchase order, click on the [Clear] button on the bottom right of the form.
Confirm a purchase order
Once a purchase order has been issued it is transmitted to the Supplier. It is possible that a purchase order may need editing to correct unit purchase price, etc. This can be done in the “Purchase Order Registry”:
menu > Purchase Orders > Purchase Registry
⇒ Opens the registry of purchase orders
By opening the Action menu on the right end of the line for a specific purchase order, you may click on the “Edit” link to edit the purchase order. This Action menu also has a link to print the “Document” for the purchase order. It is likely that this will be needed during the process of receiving the actual stock when the order arrives.
Once the supplier has confirmed that they can provide the stock, you need to change the status of the purchase order. To do this, use the Action menu for the purchase order and click on the “Edit Status” link and change the status to “Confirmed”.
WARNING: Once a purchase order is confirmed, it can no longer be edited.
Receive and enter stock from a purchase order
When a delivery stock for a purchase order arrives and the requesting depot, it is necessary to “Enter” this stock. This involves two things: (1) Physically unpacking the stock and confirming that all requested stock has arrived, and (2) registering the entry of the stock in the BHIMA software.
First, we need to open the stock “Entry” form:
menu > Stock > Stock Entry
⇒ Opens the form for entering stock
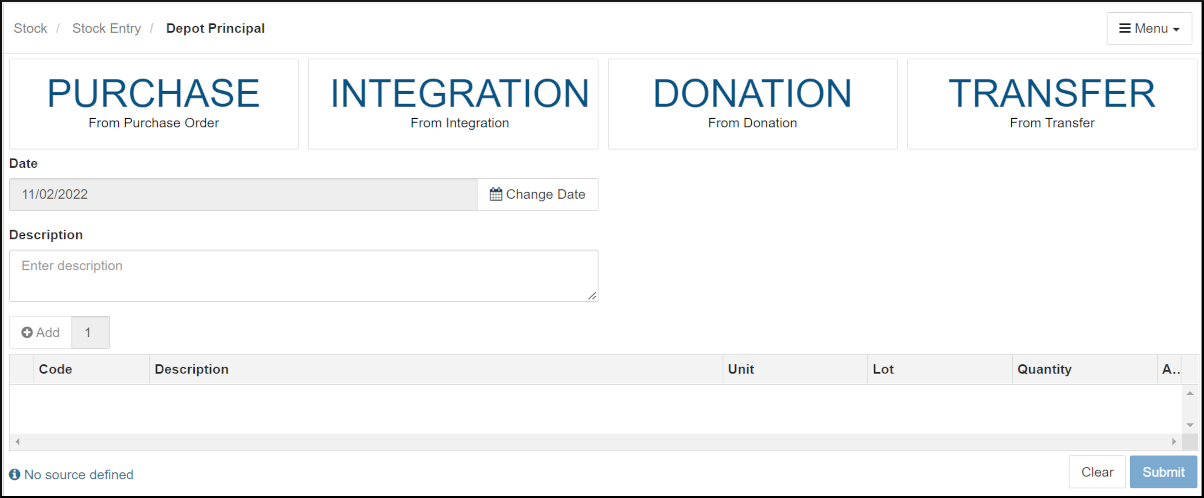
-
First, make sure you have the correct depot selected. If not use “Choose Depot” link under the the [Menu] button on the top right to correct it.
-
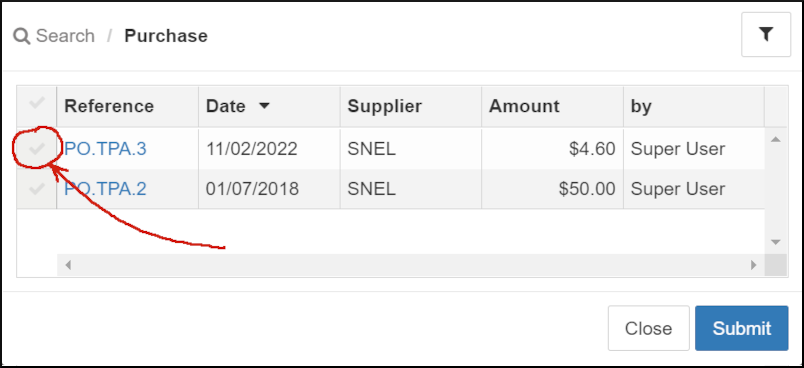
Next, click on the “Purchase” box on the top left to select the source for the entry. This will bring up a list of purchase orders for you to choose from.
-
You can verify the purchase order details by clicking on its “Reference” number (in blue). This will bring up a Purchase Order receipt with details. Click on the “Close” button on the bottom right when you are finished reviewing the details.
-
Once you have identified the correct purchase order, click on the check mark to the left of the “Reference” identifier (circled in red here). It should change color from light gray to dark gray and the whole line should be highlighted.
-
Press the blue [Submit] button at the bottom right of the form to confirm.
-
This will bring up the entry form pre-populated with the stock items from the purchase order.
-
-
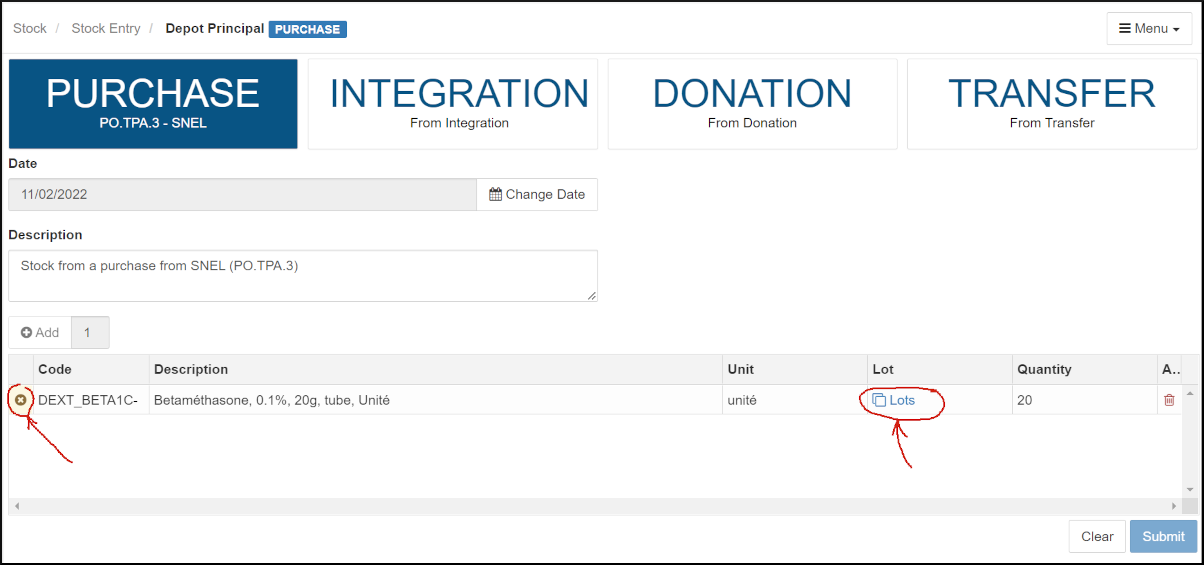
Once the pre-populated Entry appears it looks like this:
-
Notice that the source (“Purchase”) is highlighted, that a suggested description is entered, and the stock items from the Purchase order are listed. Update the description as appropriate.
-
However, notice that the red X-mark to the left of the stock item line shows you that something still needs to be done. In order to finish, we must specify the “Lots” entry for the item. For further information about Lots, see the glossary.
-
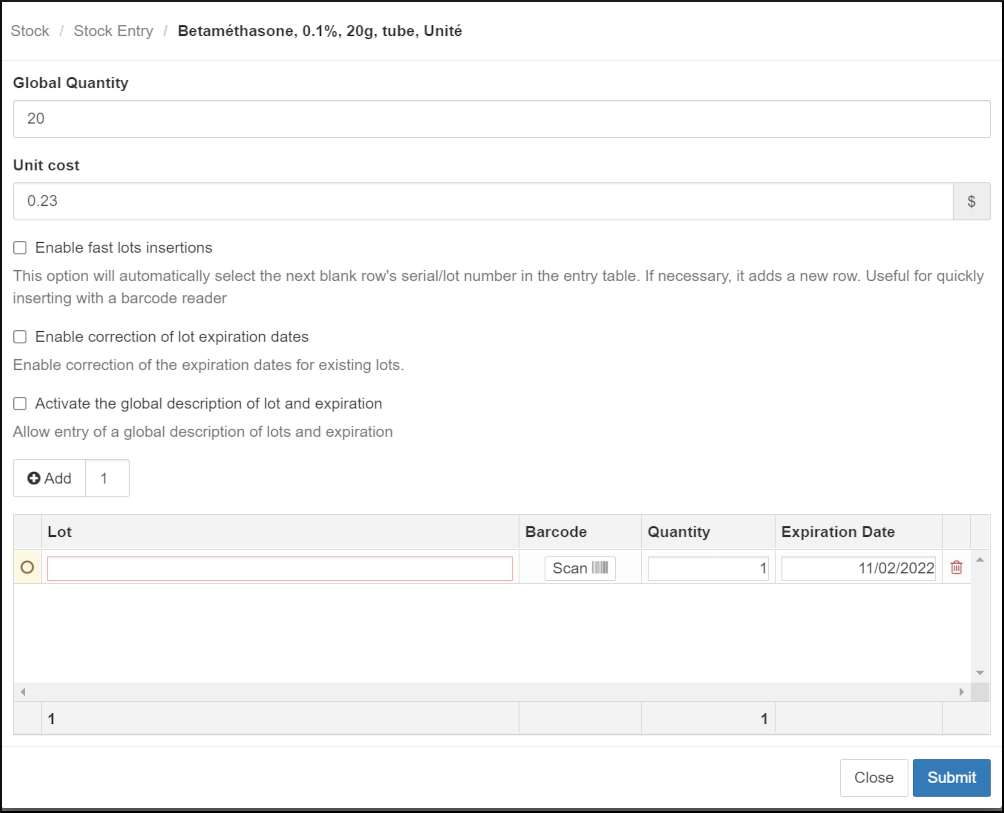
Click on the blue “Lots” link (by its icon). The Lot entry form will be displayed:
-
In the “Lot” field, enter an identifier for the incoming lot, then update the quantity and expiration date based on the actual items received.
Normally the “Lot” field will be a unique lot identifier. Either select an existing lot or create a new lot ID. Notice that there is Barcode scan button to the right of the “Lot” field. This allows you to read the identifier from a barcode on the item, if present.
-
The quantity must not exceed the overall “Global Quantity” at the top of the page which is taken from the original purchase order. If quantity is wrong, an error message will appear at the bottom of the page.
-
NOTE: The unit cost here is the default cost taken from the order form. Take care to replace it with the real purchase cost.
-
-
You can add as many lines as there are lots, by pressing the “Add” button on the left above the table. This might be necessary if some of the delivered items are from different lots.
-
Once you are finished and there are no errors, click the “Submit” button to confirm. This will take you back to the main entry form.
-
-
-
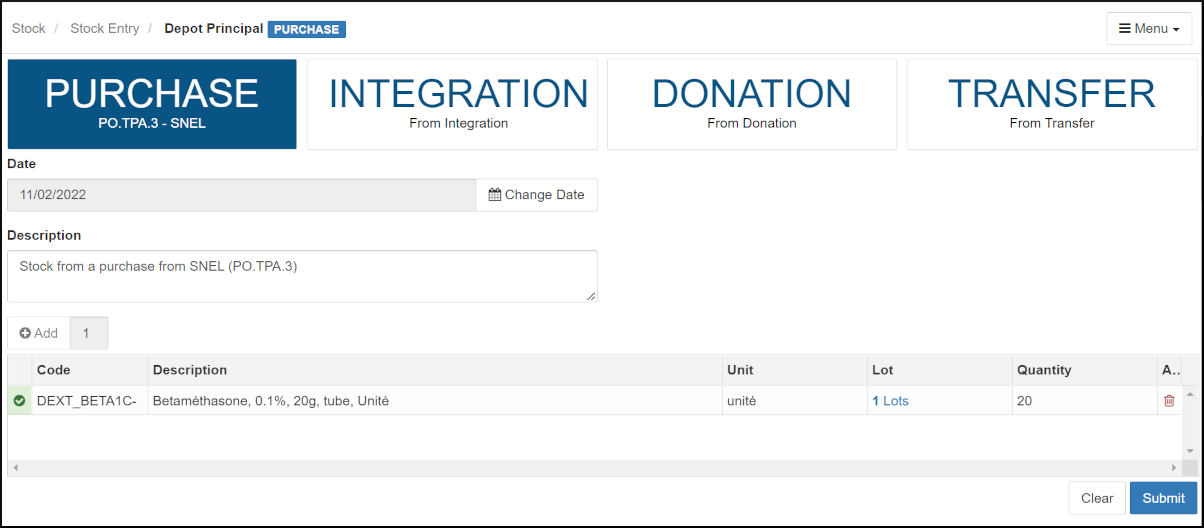
Once you have completed entering the lot information for all incoming items, the entry is ready to submit:
-
Notice that the Stock entry line now has a green check mark on its left end indicating that it is now completed.
-
Now press the blue “Submit” button on the bottom right. This completes the preparation of the stock entry by purchase order. A Stock Entry receipt (voucher) is displayed which can be printed.
-
Stock Entry by Integration
What is an integration entry? Assuming that during an inventory of stock, a stock item is found that has never been registered in the stock (inventory) in the BHIMA system. Since it is neither a purchase nor a donation, but it must be included in the stock inventory, we use “integration” to do that.
Here is how to proceed: Bring up the Stock Entry form:
menu > Stock > Stock Entry
⇒ Opens the form for entering stock
-
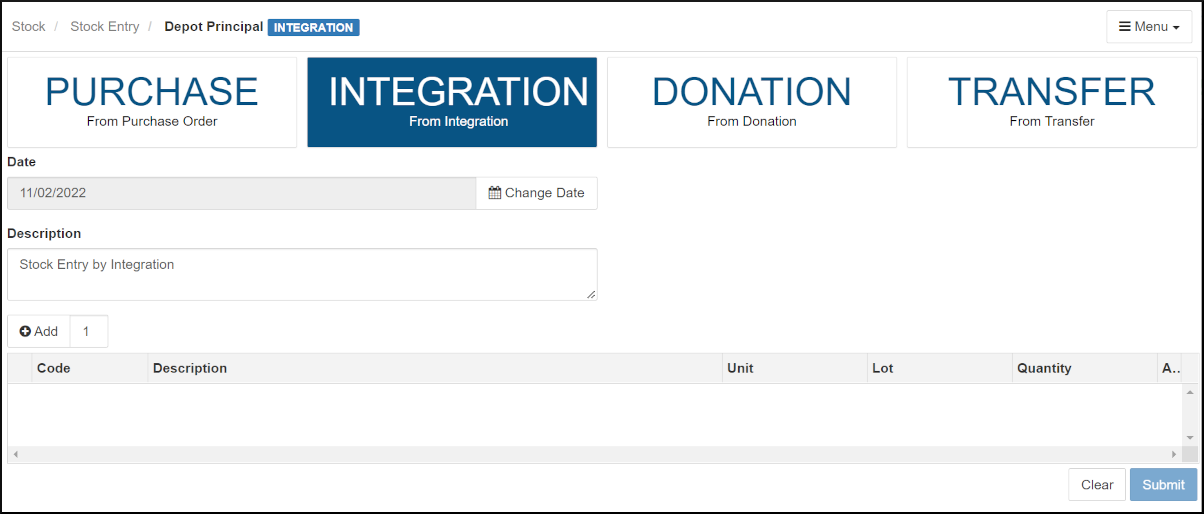
Click on the “Integration” source at the top. You should see a form like this:
-
Unlike the entry of stock by purchase which called on the purchase order, here, you start by first entering a required description of the reason for the integration (by clicking on the box under “Description”). No purchase order is needed.
-
Then click on “Add” button to add lines on table for adding new stock entries (by integration). From this point the operations are very similar to those for stock entry by purchase.
- Note that you will again edit the Lot field for each added item. However, in this case we have no purchase order, so you must enter the “Global Quantity” at the top of the Lot Entry form yourself. If not, you will get an error message and will not be able to complete the Lot Entry form.
-
Once the lot entries are completed, click on the main [Submit] button to complete the entry. You will be offered a document for the entry.
-
Stock Entry by Donation
The procedure for entering stock by donations is no different from that by integration – but you specify that it is a donation entry by clicking on the “donation” button which is then highlighted in blue.
Similar to stock entry by integration, there is no purchase order involved so the Lot “Global Quantity” must be set appropriately on the lot selection forms.
Stock Entry by Transfer
Entry of stock by transfer from one depot to another is one of the typical ways that stocks enter a depot’s stock inventory. The receiver could be pharmacy or another depot. However, requisitions for the transfers must already exist for transfers to occur (more on this later).
Bring up the Stock Entry form:
menu > Stock > Stock Entry
⇒ Opens the form for entering stock
-
FIRST, make sure the receiving Depot is selected (look on the “bread-crumb” line at the top of the form). If the receiving depot is incorrect, select the correct one using the “Choose Depot” link under the [Menu] button on the top right of the form.
-
Once the correct receiving depot/pharmacy is selected, click on the “Transfer” source at the top. You will see a pop-up menu with the candidate transfers:
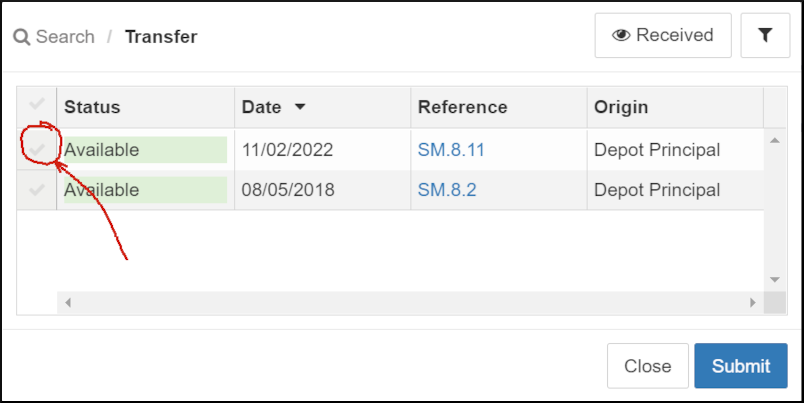
Select the items to be entered from the originating depot by clicking on the small check mark on the left end of the line (circled in red here). The check mark should change from light gray to dark gray. Then click on the blue [Submit] button at the bottom of the dialog.
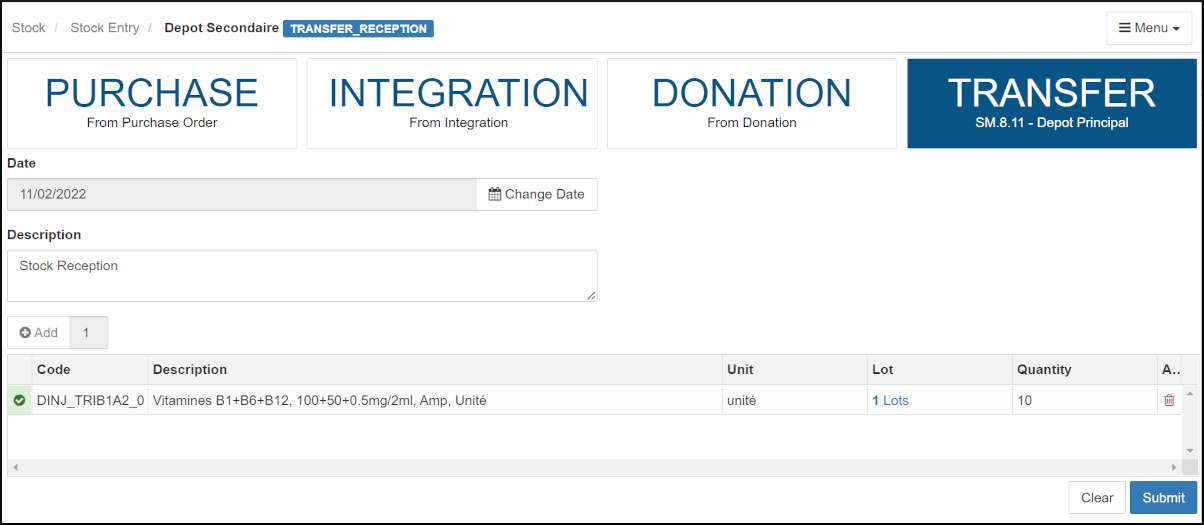
You should see the entry form like this:
-
Note that you might not see all four sources (Purchase, Integration, Donation, Transfer) depending on how the Depot was configured. See Depot Management for more information.
-
At this point, you may click on the blue “Lot” link on each entry line to update or correct the Lot identifier, quantity, and expiration date based on what was actually received.
-
You may want to update the description field to describe more details about the delivery.
-
Click on [Submit] at the bottom of the page to the right to confirm the stock entry and to update the local stock inventory.
-
An entry voucher certifying entry into stock will be displayed. You can print it by clicking on the “Print” button (🖶) or download it using the “Download” button (⭳).